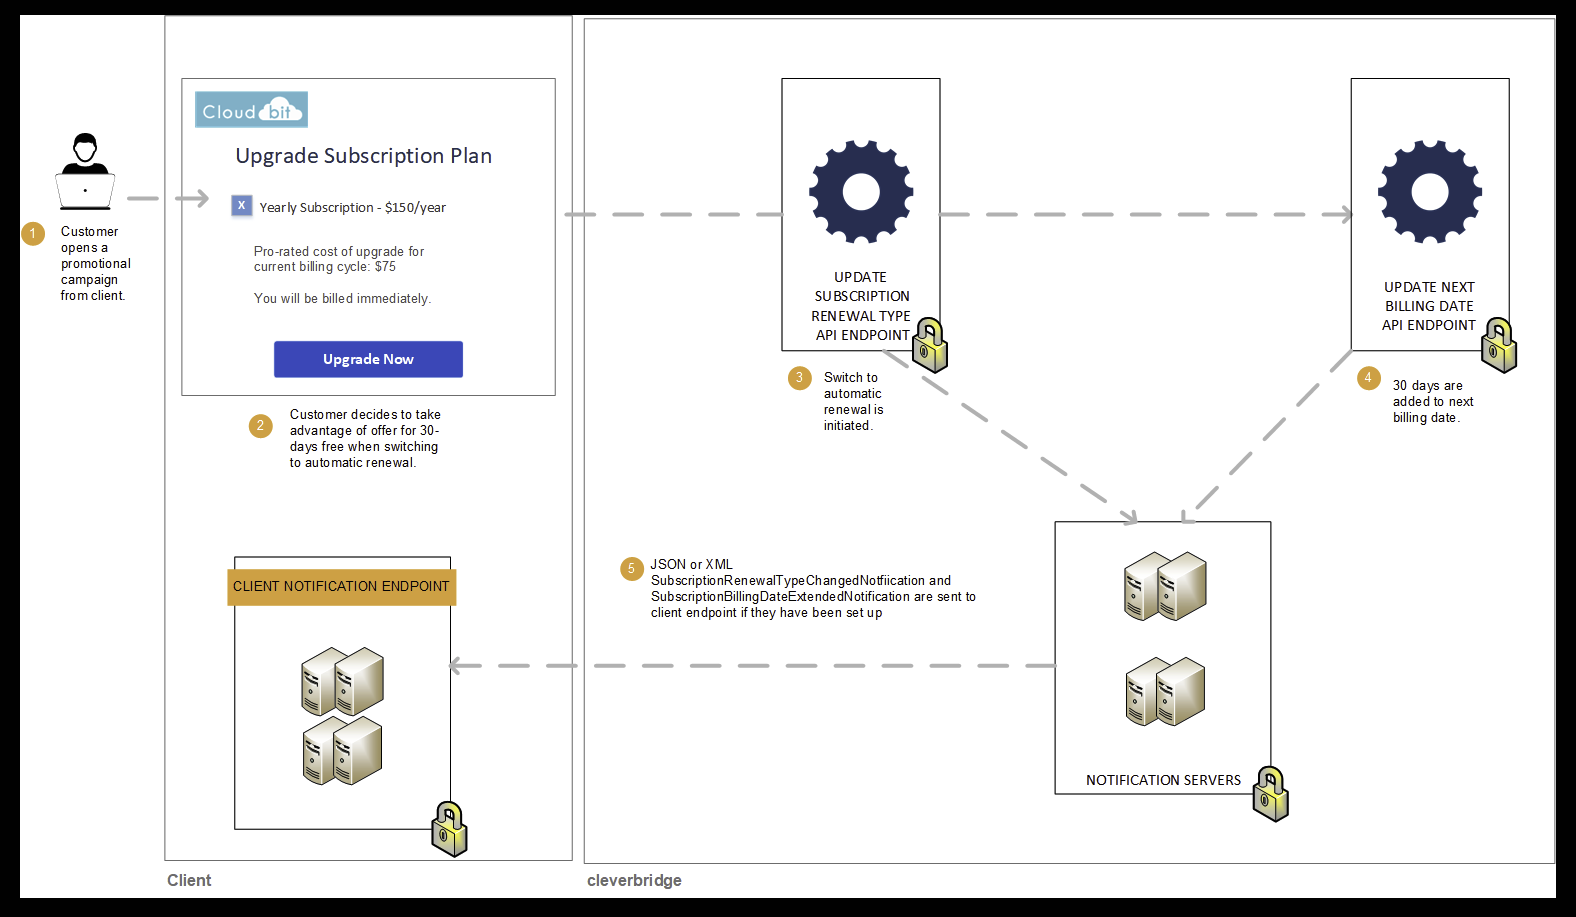
Switch to Automatic Renewal and Extend Next Billing Date
Automated renewal programs help you retain subscribers longer, while lowering your marketing costs and increasing customer lifetime value. One way to convince customers to switch to automatic renewal is by offering them a period of free usage if they do switch. To incorporate this strategy, integrate the following flow into your system:

Step 1: Change renewal type for the customer
If a customer would like to take advantage of your offer to switch to automatic renewal, call the Update Subscription Renewal Type API endpoint to change the customer's subscription renewal type from manual to automatic. In the API call, include the customer's SubscriptionIdand indicate that RenewalType should be changed to Automatic.
curl --request POST \
  --url https://rest.cleverbridge.com/subscription/updatesubscriptionrenewaltype \
  --header 'accept: application/json' \
  --header 'content-type: application/json' \
  --header 'authorization: Basic xxxxxxxxxxxxxxxxxxxxxxxxxxxxxxxxxxxx' \
  --data '{
    "SubscriptionId": "S12345678",
    "RenewalType": "Automatic"
  }'
Step 2: Cleverbridge sends you a SubscriptionRenewalTypeChangedNotification
Cleverbridge sends you a SubscriptionRenewalTypeChangedNotification, which contains information that allows you to update your local ecosystem (CRM, ERP, etc.). It includes:
| Field Name | Description |
|---|---|
subscriptionID | The Cleverbridge subscription ID |
renewalType | Whether the subscription now has an Automatic or Manual renewal type |
{
  "meta": {
    "type": "SubscriptionRenewalTypeChangedNotification",
    "date": "2019-03-19T14:47:34.857671",
    "schemaUrl": "<https://www.cleverbridge.com/JsonNotificationSchemas/SubscriptionRenewalTypeChangedNotification>"
  },
  ...
  "items": [{
    ...
    "recurringBilling": {
      "subscriptionId": "S12345678",
      ...
      "renewalType": "Manual"
      ...
    }],
  ...
  }
}
Step 3: Extend next billing date for the customer
After that, call the Update Next Billing Date API endpoint to extend the next billing date, free of charge (e.g., for 30 days). In the API call, include the new NextBillingDate and SubscriptionId.
curl --request POST \
  --url https://rest.cleverbridge.com/subscription/updatenextbillingdate \
  --header 'accept: application/json' \
  --header 'content-type: application/json' \
  --header 'authorization: Basic xxxxxxxxxxxxxxxxxxxxxxxxxxxxxxxxxxxx' \
  --data '{
    "NextBillingDate":"2019-09-01T12:20:50.52Z",
    "SubscriptionId":"S12345678"
  }'
Step 4: Cleverbridge sends you a SubscriptionBillingDateExtendedNotification
Cleverbridge sends you a SubscriptionBillingDateExtendedNotification, which contains information that allows you to update your local ecosystem (CRM, ERP, etc.). It includes:
| Parameter | Description |
|---|---|
subscriptionID | the Cleverbridge subscription ID |
nextBillingDate | the next billing date |
{
  "meta": {
    "type": "SubscriptionBillingDateExtendedNotification",
    "date": "2019-03-19T14:47:34.857671",
    "schemaUrl": "https://www.cleverbridge.com/JsonNotificationSchemas/PaidOrderNotification"
  },
  ...
    "items": [{
      ...
      "recurringBilling": {
      "subscriptionId": "S12345678",
      ...
      "nextBillingDate": "2020-01-01T12:59:59.111100",
      ...
    }],
    ...
  }
}
ImportantIt is only possible to integrate this flow if you are using Subscription Management 2.0. For more information, see Subscription Management 1.0 and 2.0.
Updated 3 months ago